
damon, my rig has been stripped completely! after all last season fishing as much as i did in the weather we had i have found my problems with my rig that needed to be addressed!
storage! storage! storage! dryyyyy storage!
i found myself needing more space all the time and the rain never helped
i used mostly 2x2's for the framing and 1/2 inch finished plywood for the deck itself,
you can see my profile there are pictures there, that was a weekend project 2 full days and i was ready to fish.
HOWEVER! this is a new season and i have done my homework!
since i do not have access to a garage or shop to get my boat deck started i will have to wait probably another month to get going if weather permits of course!
i will be constructing front deck similar to before (little modified), flooring, and rear deck as well. picture progress of course for all you interested in jon boat mods!
not sure yet it if i want to make a permanent livewell i liked having the extra room when not fishing for maff
ill post up as soon as i begin!
Damon keep up the great work! hopefully we can fish in the same boat this year!
Alright guys, so here's the next quick update. The friend Im building this boat for stopped in last night to check it out.... needless to say he was more than happy. He hadn't seen it since it was first left here, still hadnt even been sandblasted!!!
Well after seeing whats been done so far hes decided to add a "few" accessories, list is as follows:
-Livewell aerator/recirculator pump
-Bow and stern Nav Lights (3 or 2 wire quick disconnects)
-12v Bow and Stern Accessory Ports
-Front Fishfinder
-Led Deck Lighting
-Compartment Led lights
-Bilge Pump
-Lit and Fused Accessory/Power Panel
All these things will significantly increase the overall cost of the boat in term of parts, however the comfort and "trick" factor cant be beat!! Just not sure if he cleared the additional budget modifications with his wife....
Upon completion Ill try to do a cost breakdown of just the deck and no accessories just to give everyone the base line number for a similiarly constructed deck! Enjoy!
In preparation for the newly requested accessories I figured some prep was in order. With massive amounts of wiring in the furture, wire management is a priority!!
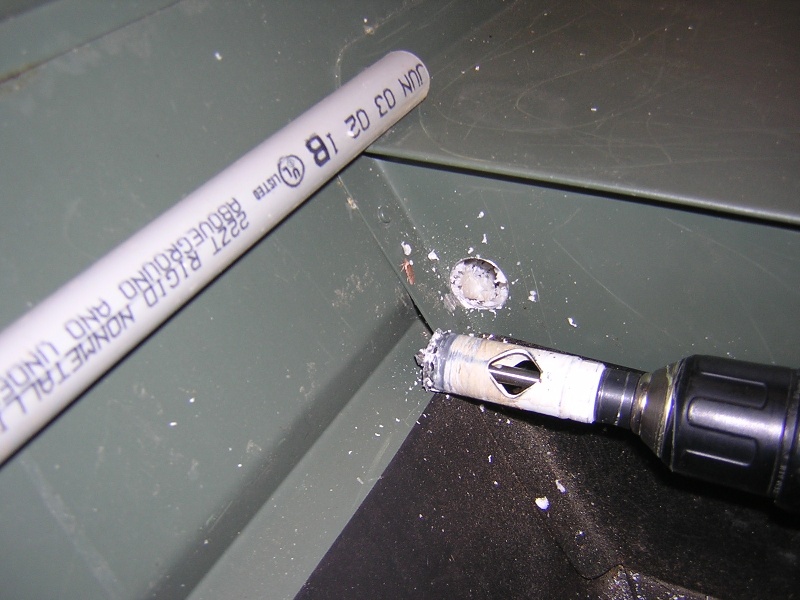
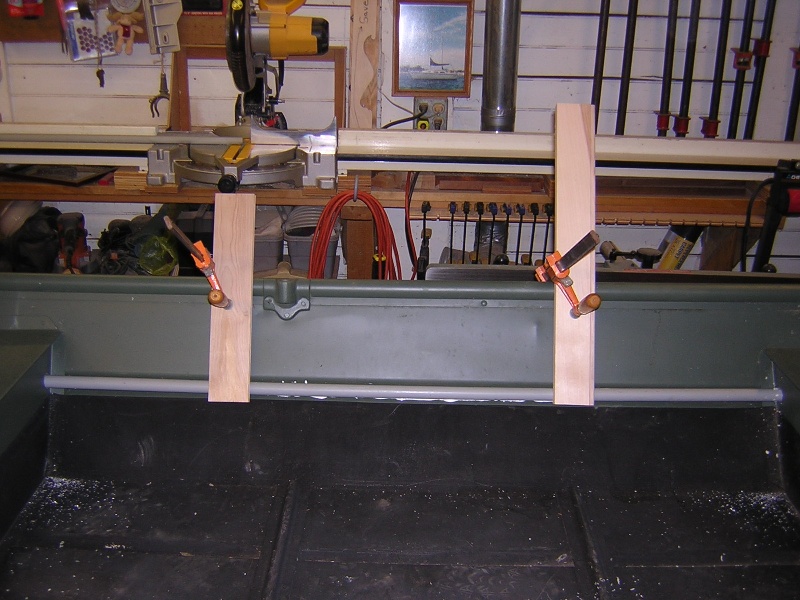
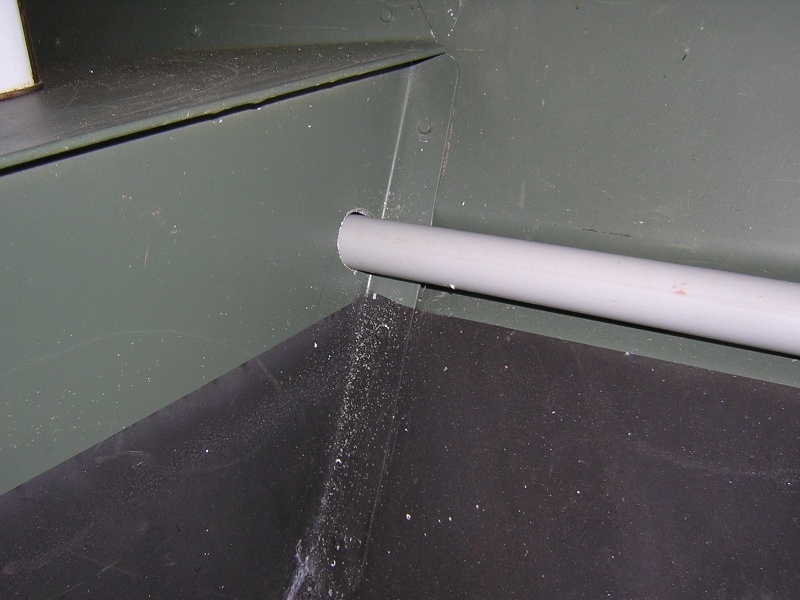
After a trip to the lumber yard, problem solved. 2 peices of 1/2" PVC electrical conduit. Durable, sunlight and moisture resistant, and it conviently fits in the premolded rib that runs along the gunnale!! Note in the photos were to drill through the seat, I prefer this as I feel it doesnt sacrifice the structural intergrity of that flange. I glue it in with 3M 5200 marine grade sealant, 24 hours in clamps, duct tape, bunch of cross sticks wedging the two in, you get the idea, and instant wire runs!! The runs on the Starboard side are for the electronics, the port side will house all the electrical, keeps it interference free!!
Ohh total spent today was: 2.39 per peice so roughly 5.00
Bringing the grand total so far to : 277.00 + 5.00= 282.00
Not bad so far for the boat, paint job, deck frame, livewell, and wire management!!!
Well after seeing whats been done so far hes decided to add a "few" accessories, list is as follows:
-Livewell aerator/recirculator pump
-Bow and stern Nav Lights (3 or 2 wire quick disconnects)
-12v Bow and Stern Accessory Ports
-Front Fishfinder
-Led Deck Lighting
-Compartment Led lights
-Bilge Pump
-Lit and Fused Accessory/Power Panel
All these things will significantly increase the overall cost of the boat in term of parts, however the comfort and "trick" factor cant be beat!! Just not sure if he cleared the additional budget modifications with his wife....
Upon completion Ill try to do a cost breakdown of just the deck and no accessories just to give everyone the base line number for a similiarly constructed deck! Enjoy!
In preparation for the newly requested accessories I figured some prep was in order. With massive amounts of wiring in the furture, wire management is a priority!!
After a trip to the lumber yard, problem solved. 2 peices of 1/2" PVC electrical conduit. Durable, sunlight and moisture resistant, and it conviently fits in the premolded rib that runs along the gunnale!! Note in the photos were to drill through the seat, I prefer this as I feel it doesnt sacrifice the structural intergrity of that flange. I glue it in with 3M 5200 marine grade sealant, 24 hours in clamps, duct tape, bunch of cross sticks wedging the two in, you get the idea, and instant wire runs!! The runs on the Starboard side are for the electronics, the port side will house all the electrical, keeps it interference free!!
Ohh total spent today was: 2.39 per peice so roughly 5.00
Bringing the grand total so far to : 277.00 + 5.00= 282.00
Not bad so far for the boat, paint job, deck frame, livewell, and wire management!!!

So here's the daily update:
Took a 2 hour lunch and grabbed supplies:
1 sheet 4 x 8 1/2" fir underlayment: 27.00
1 sheet 4 x 4 3/4" PT (Upper Deck): 21.00
2 Cans 3M Spray Adhesive for carpet: 24.00
Total Spent: 72.00
Total So Far: 282.00 + 72.00 = 354.00 (Got all the plywood and adhesive now thou, ohh and 10.00 for a miss mixed gallon of exterior paint, happens all the time just ask!!)
Total : 364.00
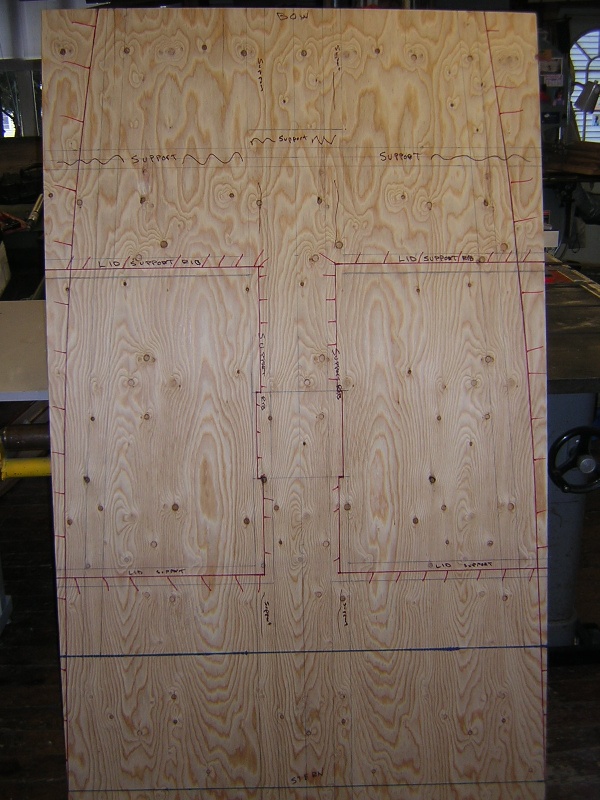
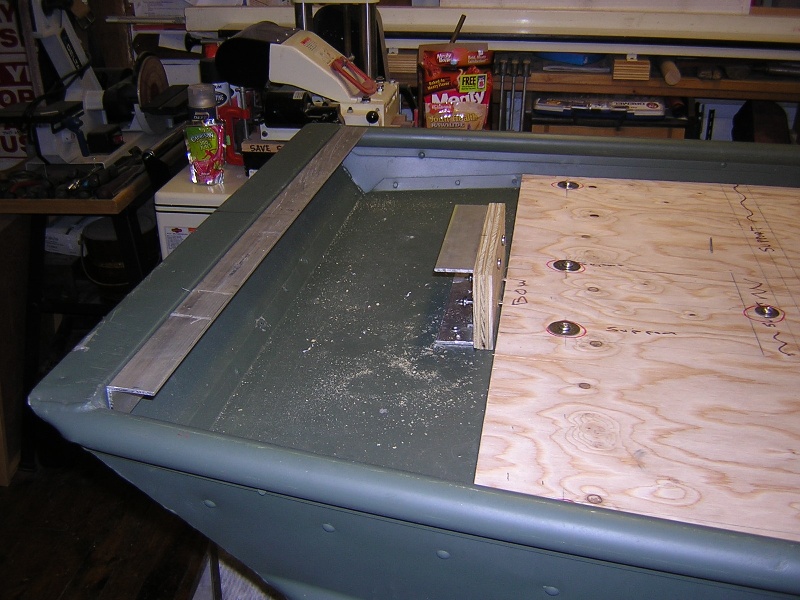
Now many are saying why didnt you get marine grade, well its a special order at 75.00 a sheet. I have used it in the past on my conversions, and have found the the best "budget" alternative is 1/2 fir underlayment. Now the trick to this is to make ALL your cuts, holes, exposed edges, then seal the entire thing with 3-4 coats of any exterior house paint. After it has dried I upholster over it, and noone ever knows the difference. The goal of this build was to be as cheap as possible so it drove the final decision. I will note that my current rig has had this same plywood, sealed the same way for over 6years with not one stitch of a problem!! Those of you that may have a "larger" budget however, I would not dissuade you from using marine grade!
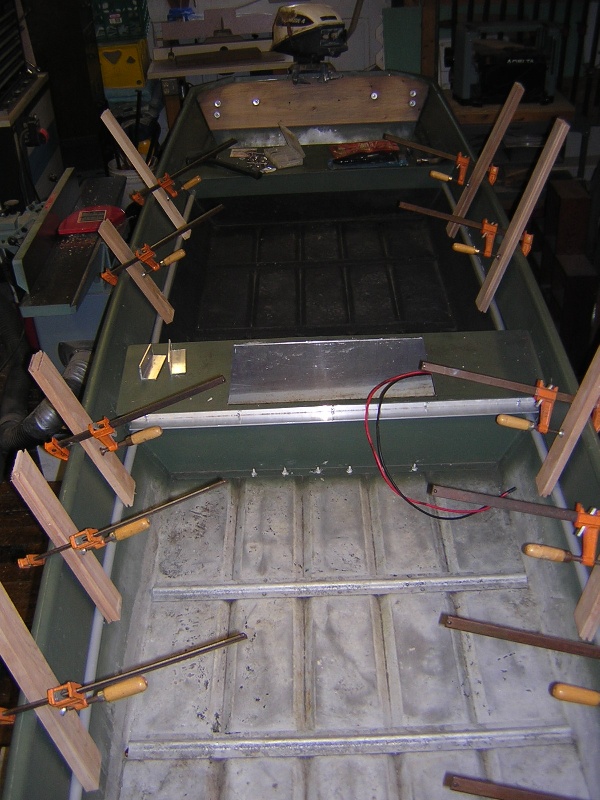
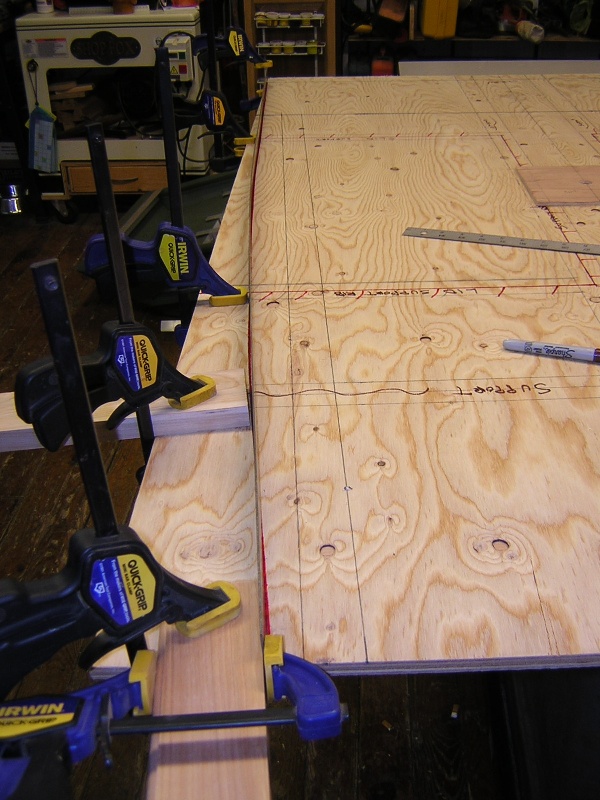
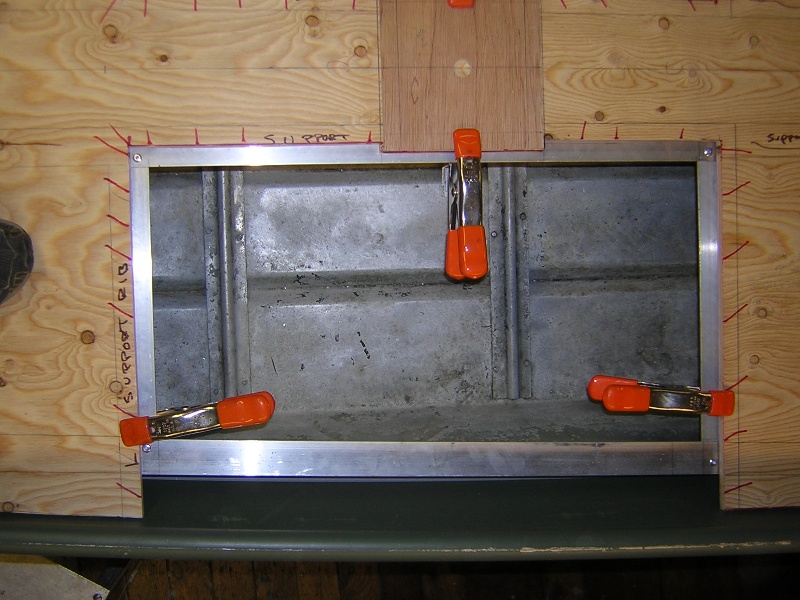
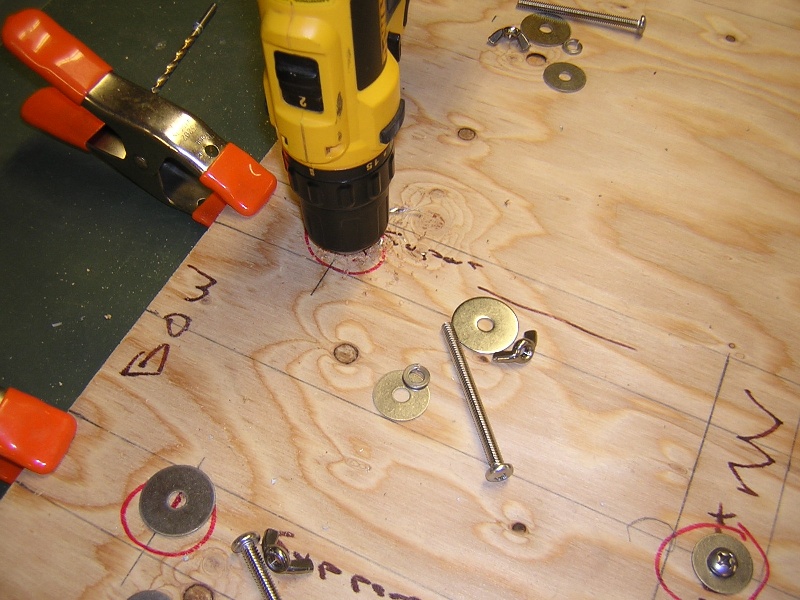
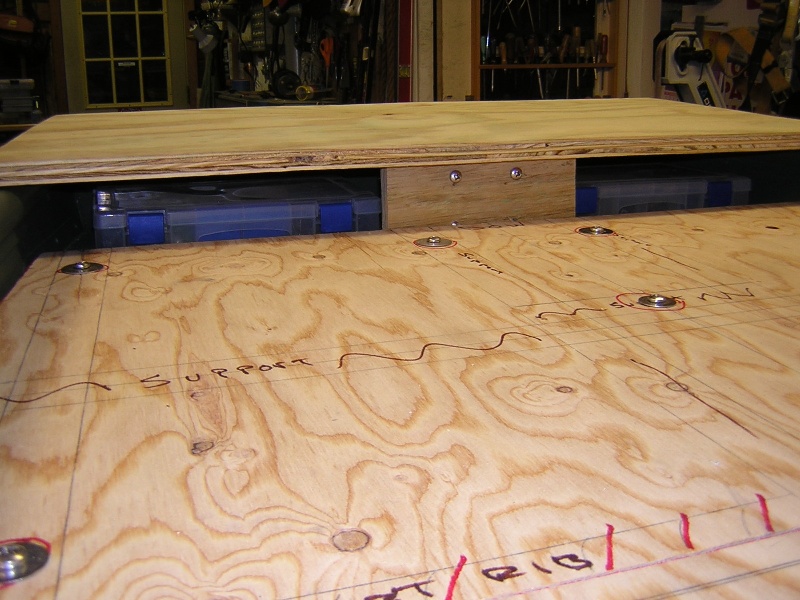
Now the plywood was not just layed on top of the boat and traced, actually it never even sat on it!! It was cut by laying out the entire frame, using measurement, out onto the plywood then using the trick in the photos I transferred the compound curve of the hull onto the plywood. Make sure everything is dimensional, those paying attention to the frame photos will have noted the square. If you squared your frame, and it was built of the center line of the boat you can do the same to the deck plywood. Take your time with this, and do it by measurement not tracing, make sure to layout all of your ribs, lids, bracing, etc. This will save you gobs of time when you go to attach this all together. I even laid out bolt centers on all the ribs to speed up fabrication. More time spent on layout means less time later!! If you've done it correctly it will be a "One Cut, one drop" deal as it usually doesnt need any additional trimming if done correctly!! I posted a close up photo of the deck and frame at the bow, notice how the layout matches the position of the frame rails, this is ultimately the result of a proper layout.
The key to success here is take your time and measure 100 times if needed, and always remember to pull your measurements from a common point.
Any questions let me know!!


Took a 2 hour lunch and grabbed supplies:
1 sheet 4 x 8 1/2" fir underlayment: 27.00
1 sheet 4 x 4 3/4" PT (Upper Deck): 21.00
2 Cans 3M Spray Adhesive for carpet: 24.00
Total Spent: 72.00
Total So Far: 282.00 + 72.00 = 354.00 (Got all the plywood and adhesive now thou, ohh and 10.00 for a miss mixed gallon of exterior paint, happens all the time just ask!!)
Total : 364.00
Now many are saying why didnt you get marine grade, well its a special order at 75.00 a sheet. I have used it in the past on my conversions, and have found the the best "budget" alternative is 1/2 fir underlayment. Now the trick to this is to make ALL your cuts, holes, exposed edges, then seal the entire thing with 3-4 coats of any exterior house paint. After it has dried I upholster over it, and noone ever knows the difference. The goal of this build was to be as cheap as possible so it drove the final decision. I will note that my current rig has had this same plywood, sealed the same way for over 6years with not one stitch of a problem!! Those of you that may have a "larger" budget however, I would not dissuade you from using marine grade!
Now the plywood was not just layed on top of the boat and traced, actually it never even sat on it!! It was cut by laying out the entire frame, using measurement, out onto the plywood then using the trick in the photos I transferred the compound curve of the hull onto the plywood. Make sure everything is dimensional, those paying attention to the frame photos will have noted the square. If you squared your frame, and it was built of the center line of the boat you can do the same to the deck plywood. Take your time with this, and do it by measurement not tracing, make sure to layout all of your ribs, lids, bracing, etc. This will save you gobs of time when you go to attach this all together. I even laid out bolt centers on all the ribs to speed up fabrication. More time spent on layout means less time later!! If you've done it correctly it will be a "One Cut, one drop" deal as it usually doesnt need any additional trimming if done correctly!! I posted a close up photo of the deck and frame at the bow, notice how the layout matches the position of the frame rails, this is ultimately the result of a proper layout.
The key to success here is take your time and measure 100 times if needed, and always remember to pull your measurements from a common point.
Any questions let me know!!
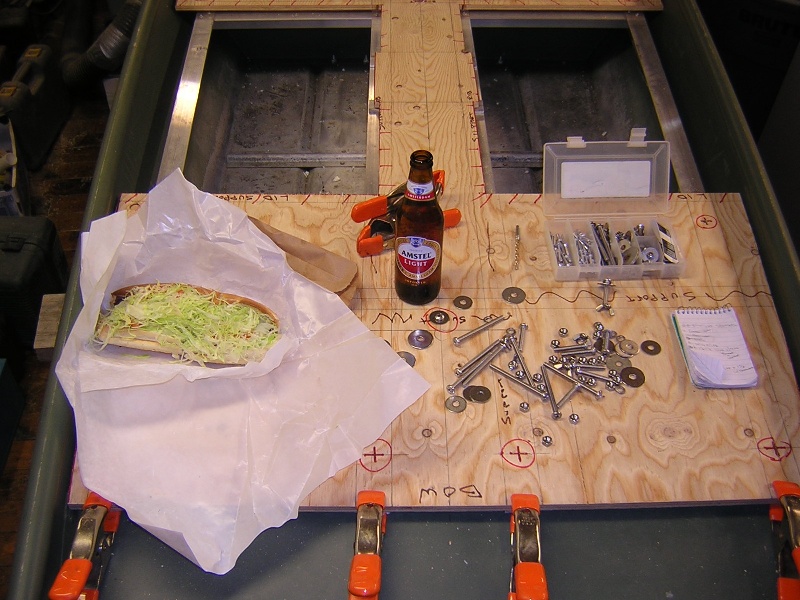
So had to do 2 updates today!! Actually got a break from my single dad duties, and decide to have dinner on the deck!!!
Now in my run to get dinner I stopped at the hardware store and bought more stainless steel fastners, altogether a total of 40.00
Bring our total to: 404.00
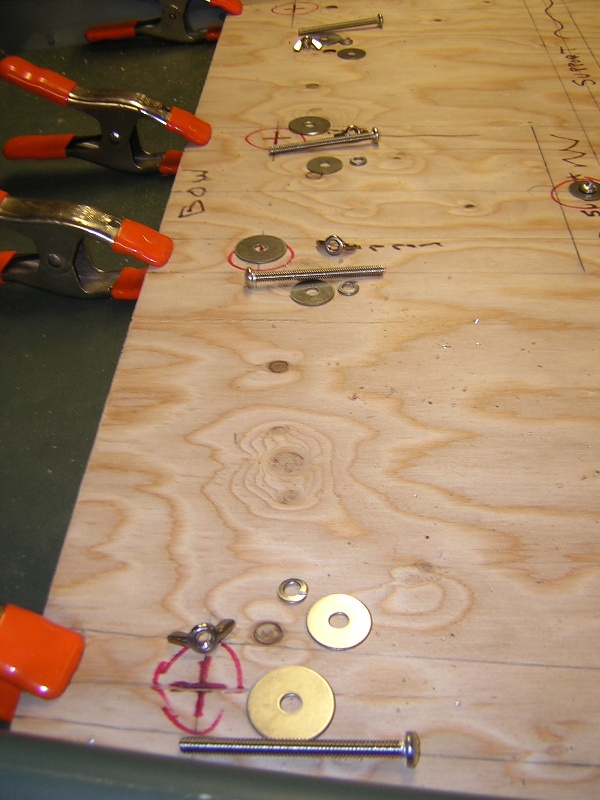
Now I could have gotten cheaper galvanized stuff, but fasteners is where i wont cut corners. These bolts hold the deck to the frame, and the frame to the boat. Should I ever need to remove them I dont want any headaches!!! A little spent here is a wise investment as far as Im concerned.
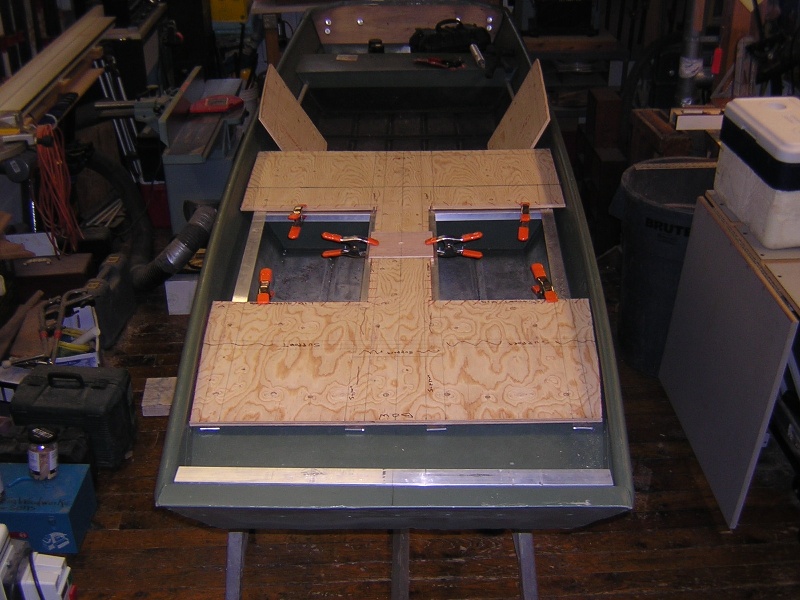
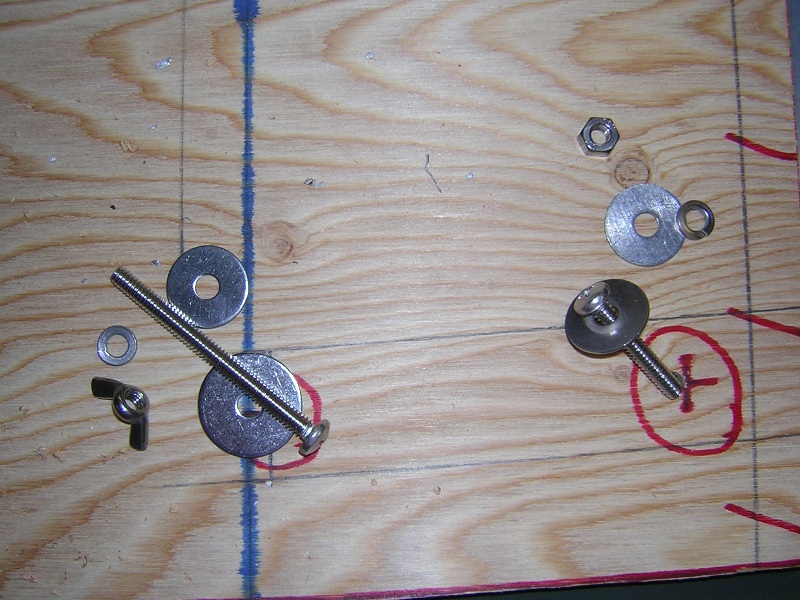
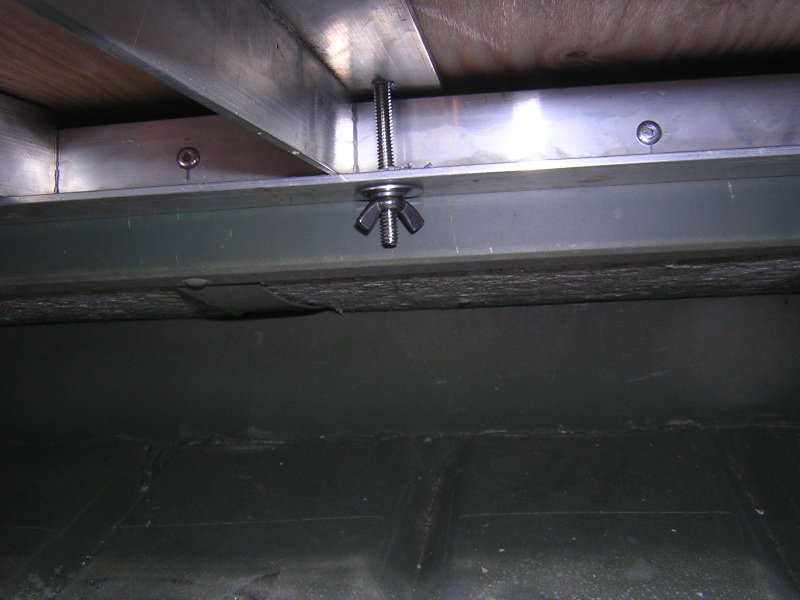
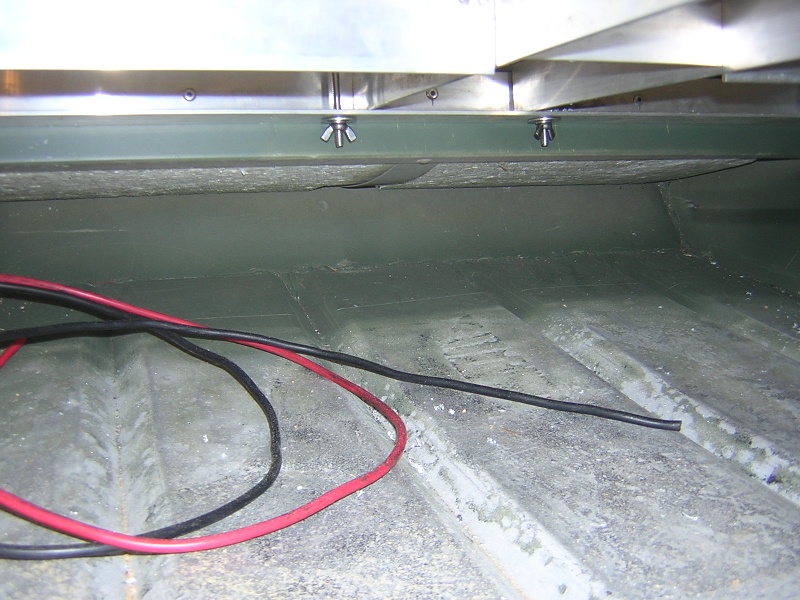
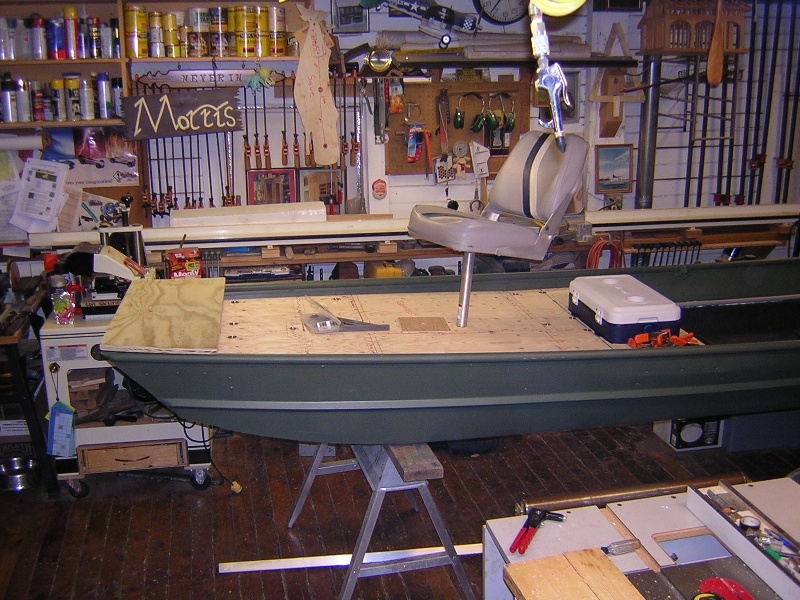
After cutting in the livewell I finished fastening the deck to the frame, notice how important the layout was!!! I also included shots of the different bolt sizes I used and the thru "ledger" connection that holds the deck in, all removable with the wing nuts. The deck to frame bolts are 1 1/2" 1/4 20 Stainless, and the ledger connection bolts are 3" 1/4 20 Stainless. When installing these start with the deck/frame bolts, when drilling the holes start from the center and work your way out, this will ensure the deck is level. The last holes to be drilled are the deck/ledger bolts, again start in the middle and work your way side to side, making sure the frame is on the ledger all around.
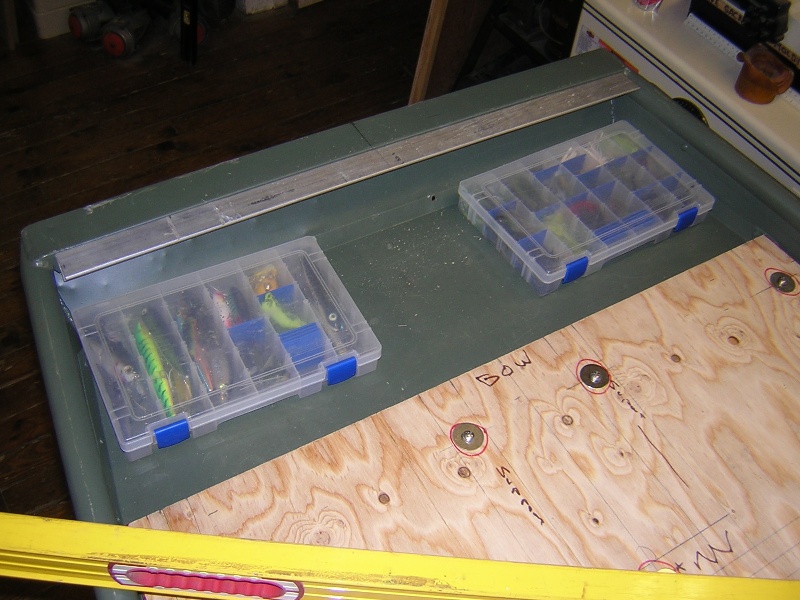
After I moved on to the front deck, this was sized earlier for plano boxes (TALK ABOUT STORAGE ) that I keep handy during tourneys. In my own boat because of its higher gunnales i can keep 2 planos stacked up on either side, and a dry storage box with my wallet and essentials. This becomes a permenant fixture in my boats as it is also the platform for the trolling motor and electronics. This way they stay with the boat if Im using it without the deck.
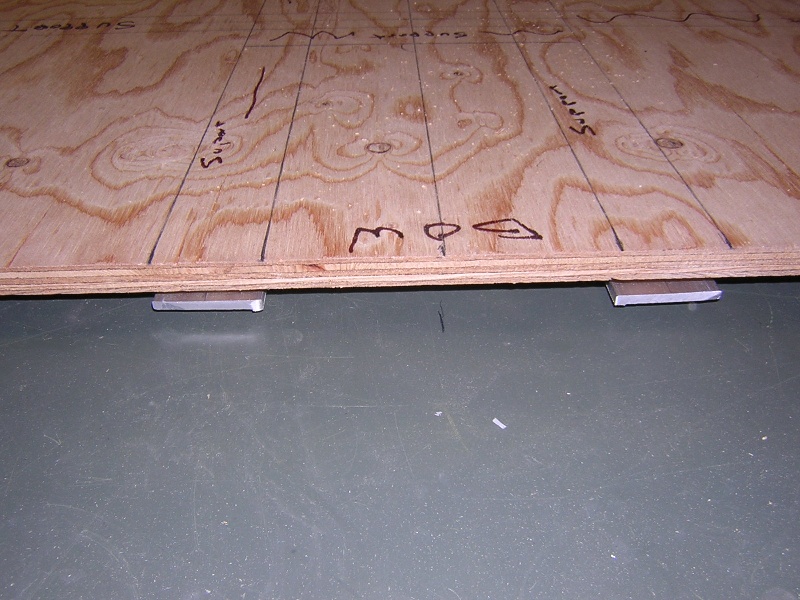
Stay tuned as Ill be moving into my "Dry storage Gutters" (This is for you Chevin!!) under the main deck, removes with the deck, and actually works really well in combination with the storage totes under the deck. Also Note how I overhang the upper deck over the lower, keeps the water moving in the "right" direction!!
Ask questions if you got em!!!
If the last shot doesnt make you wanna go fishing, not sure what will....

Hope you guys are enjoying this I been having a blast with it so far!!!
Now in my run to get dinner I stopped at the hardware store and bought more stainless steel fastners, altogether a total of 40.00
Bring our total to: 404.00
Now I could have gotten cheaper galvanized stuff, but fasteners is where i wont cut corners. These bolts hold the deck to the frame, and the frame to the boat. Should I ever need to remove them I dont want any headaches!!! A little spent here is a wise investment as far as Im concerned.
After cutting in the livewell I finished fastening the deck to the frame, notice how important the layout was!!! I also included shots of the different bolt sizes I used and the thru "ledger" connection that holds the deck in, all removable with the wing nuts. The deck to frame bolts are 1 1/2" 1/4 20 Stainless, and the ledger connection bolts are 3" 1/4 20 Stainless. When installing these start with the deck/frame bolts, when drilling the holes start from the center and work your way out, this will ensure the deck is level. The last holes to be drilled are the deck/ledger bolts, again start in the middle and work your way side to side, making sure the frame is on the ledger all around.
After I moved on to the front deck, this was sized earlier for plano boxes (TALK ABOUT STORAGE
Stay tuned as Ill be moving into my "Dry storage Gutters" (This is for you Chevin!!) under the main deck, removes with the deck, and actually works really well in combination with the storage totes under the deck. Also Note how I overhang the upper deck over the lower, keeps the water moving in the "right" direction!!
Ask questions if you got em!!!
If the last shot doesnt make you wanna go fishing, not sure what will....
Hope you guys are enjoying this I been having a blast with it so far!!!